Bringing Your Own Sample Mount or Environment SAXS/WAXS

Page Index
First and foremost - its always a good idea to Contact Beamline Staff when considering/planning to bring your own sample mount or sample environment. The SAXS beamline has been designed to be a general-purpose beamline and is capable of accommodating a wide range of sample mounts and environments. However, new setups always involve some uncertainties and the best results are generally achieved when beamline staff have been consulted. There are always numerous considerations when designing a sample mount or environment and the beamline staff can provide useful feedback on designs and plans. For example, a good sample environment must accommodate both the particular needs of the experiment and the geometric requirements of the beamline.
Make sure you understand that YOU will be setting up and interfacing all equipment you bring. Make sure you have all necessary parts, plumbing, fittings, electrical wiring, electrical connectors etc. available, and know how you are going to mount it and set everything up before arriving.
Safety
Electrical Certification
All equipment brought on site to the Australian Synchrotron must be certified as electrically safe and must be tested and tagged appropriately. This is not a service offered by the Australian Synchrotron, it must be done prior to bringing equipment on site. If unsure about the electrical safety of equipment, get it tested before considering using it in an experiment. Any user provided equipment that plugs into 240V power needs to be tested and tagged. Anything that can generate a high voltage needs careful scrutiny.
Pressure Certification
The safety of any equipment or sample environment pressurizing above ambient pressure must be considered. Safety certifications are usually required for any high-pressure sample environment and must be provided in advance of an experiment. If conducting experiments with high pressure safety paperwork must be submitted well in advance of the experiment to allow it to be considered appropriately.
Mounting
You are welcome to use our standard mechatronics parts (plates, breadboards, brackets, kinematic mounts etc, mostly Newport type or equivalent, fasteners, tools etc).
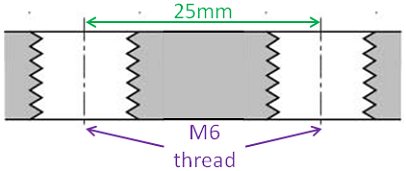
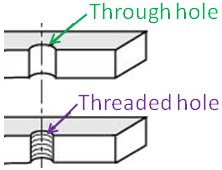
The sample table of the SAXS beamline is designed to be general purpose and is able to mount a wide variety of sample mounts and sample environments. The optical breadboard on the sample table, and a lot of our mechatronics parts, have a pattern of threaded M6 holes at 25mm pitch, as shown below. Additional optical carriers and brackets allow for many different pieces of equipment to be mounted and all of these components typically use M6 holes. If building a custom sample mount, it is recommended to include M6 through holes (6.5mm diameter holes) with a 25mm pitch to facilitate mounting on the beamline.
M6 refers to Metric 6mm, this is not the same as quarter inch.
25mm pitch refers to 25mm spacing between holes, center to center. This is not the same as one inch.
|
|
| M6 holes with 25mm pitch | Through Hole vs. Threaded Hole |
|---|
Newport X48 Posts and Carriers.
Many types of samples can be well mounted using Newport X48 rail and carrier system. We use this extensively at the beamline and have a good set of rails and carriers you are welcome to use. Part numbers are: rail X48-0.5, carriers either M-CXL48-80 or M-CXL48-50. Typically we use the rail as a post (i.e. a plate at one end attaches to the baseplate of the sample table, with the rail mounted vertically as a post. Carriers can be slid on/off (repeatably using a simple hardstop) and their metric hole pattern is well suited to simple adapters and plates for mounting your samples. The system works well because the square profile provides rotational constraint (for repeatable positioning in 3D, unlike round post) and a simple hardstop allows repeatable height positioning along the post.
For further information and drawings of the parts, see https://www.newport.com/f/48-mm-aluminum-four-sided-optical-rails
No Surprises
Showing beamline staff a new sample mount for the first time at the start of an experiment is not a recipe for efficiency, and could lead to your experiment not working. Plan your setup in advance with staff. We are happy to provide details on systems and equipment we can provide you, that can help you planning your experiment, designing any equipment and bring all the things you may need with you. We are happy to share ideas and suggestions. Information like pictures, sketches, descriptions, part numbers are very useful in communicating with staff in the leadup to your experiment, so we can help you be successful. Remember you will need to do the actual setup independently, and take responsibility for the setup being complete and ready to run on the beamline.